Most crypto projects pitch themselves as the future of money. Stellar quietly went and built the rails. Settle a payment in three to five seconds, pay fractions of a cent, send it from London to Lagos with no correspondent bank in between. That’s the design brief Jed McCaleb wrote when he forked away from his Ripple co-founder seat in 2014 and started Stellar — and the network has shipped most of it.
I’ve held XLM on and off for years, mostly as the “what if remittance actually works on-chain” position. This is the walkthrough I’d give a friend buying their first XLM on BitGet. Two of the links are affiliate. I’ll flag them on the way through.
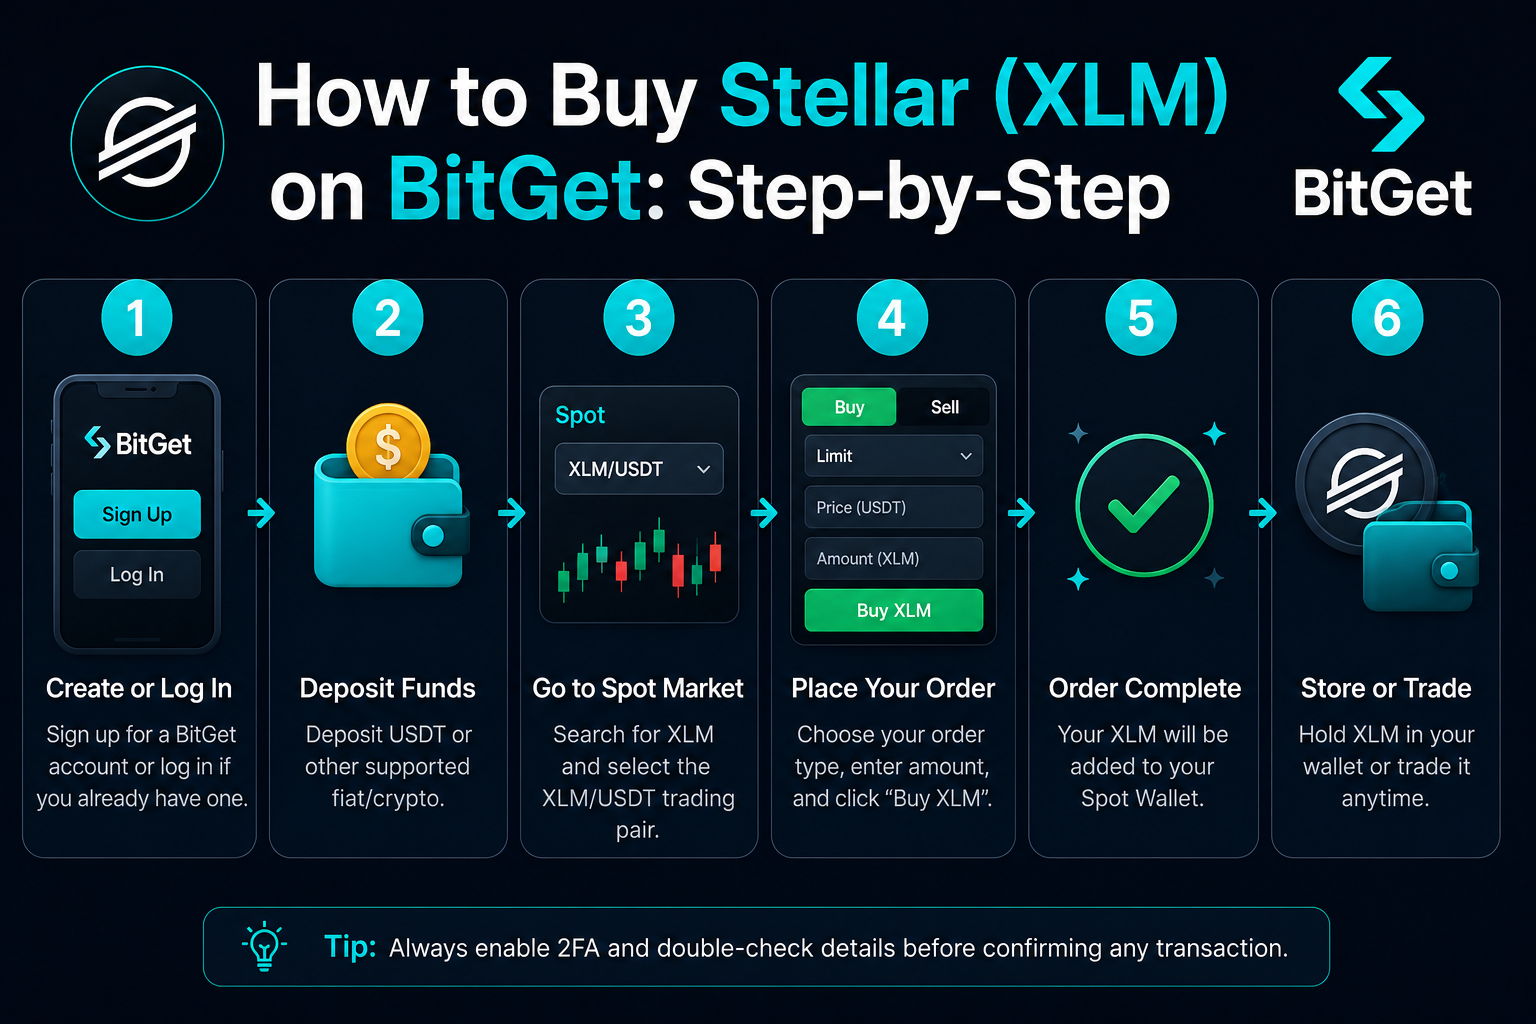
Short answer: To buy Stellar on BitGet, open an account with email, switch on 2FA, complete KYC (usually same-day), fund the account via card, P2P, bank transfer, or crypto deposit, then place a spot order on the XLM/USDT pair. Spot fees are 0.10%. Card on-ramp adds 1–3%. For long-term storage, send XLM to a Ledger Nano X — Lobstr works well as a mobile wallet. Time from signup to XLM in your wallet: about 30 minutes.
Open a BitGet account → (affiliate)
Key takeaways
- Stellar launched in 2014 as a fork from Ripple, founded by Jed McCaleb to focus on cross-border payments and financial inclusion.
- Transactions settle in 3–5 seconds at a cost of about 0.00001 XLM — practically free.
- Every Stellar account needs to hold a 1 XLM minimum balance — the network’s base reserve to prevent spam.
- BitGet spot fees are 0.10% maker/taker. Card buys add 1–3%, so P2P or a crypto deposit saves money if you can wait.
- KYC usually clears in 1–24 hours. Long-term XLM belongs on a Ledger Nano X, not on the exchange.
What Stellar is, and what it isn’t
Stellar is a payment network with its own blockchain and its own native asset, XLM (Lumens). The network uses a federated consensus model — the Stellar Consensus Protocol — that confirms blocks in seconds without proof-of-work or proof-of-stake. Validators agree on transactions through quorum slices, which sounds technical and basically means “trusted nodes vote, quickly.”
The founder is Jed McCaleb. Before Stellar he co-founded Ripple (XRP), and before that he built the original Mt. Gox exchange (which he sold long before its collapse). McCaleb left Ripple in 2014 over disagreements about direction and launched Stellar with a different focus: financial inclusion, on/off ramps to local currencies, and direct partnerships with banks and remittance firms rather than going around them.
What Stellar is not: a smart contract platform in the Ethereum sense. The network has scripted features and recently added Soroban smart contracts, but the design priority has always been payments rather than DeFi. If you want yield farming and complex protocols, you’re on the wrong chain. If you want fast, cheap value transfer, you’re on the right one.
XLM serves three jobs on the network. It pays transaction fees (basically nothing). It acts as the minimum balance every account needs (1 XLM base reserve). And it operates as a bridge currency when there’s no direct trading pair between two assets — say a Nigerian naira-pegged token and a Philippine peso-pegged token. Stellar’s built-in decentralised exchange routes the conversion through XLM when needed.
Live numbers on price, market cap, and circulating supply sit on CoinGecko’s Stellar page and CoinMarketCap. Worth a glance before placing the trade. Total supply was originally 100 billion XLM, then a chunk was burned by the Stellar Development Foundation in 2019, leaving the cap closer to 50 billion. Circulating supply moves over time as the SDF releases tokens for ecosystem grants.
For the wider context on what crypto actually is, the crypto for beginners guide covers it. For the general buying workflow that applies to any asset, the how to buy crypto parent post is the place to land.
Why Stellar matters: the remittance angle
Cross-border payments are the use case Stellar was built for. The remittance industry takes around 6.4% on average to send $200 from a developed country to a developing one, according to World Bank tracking. Stellar processes the same transfer for fractions of a cent and settles in seconds. The unit economics aren’t close.
Two real-world integrations are worth knowing. MoneyGram launched a Stellar-based service that lets users convert between fiat and USDC over the Stellar network at MoneyGram locations. IBM previously ran World Wire — a cross-border payment rail built on Stellar — used by banks for interbank settlement before IBM shut the product down. The pattern is the same: regulated payment companies using Stellar as the settlement layer underneath a familiar interface.
Asset issuance is the other piece. Anyone — including banks and stablecoin issuers — can launch a token on Stellar. Circle issues USDC on Stellar. Other regulated issuers run fiat-pegged tokens for local currencies. That makes Stellar one of the few chains where the native stablecoin volume is meaningful relative to the chain’s market cap.
None of this guarantees price action. Stellar has been “the remittance coin” for years and the price has moved more on broad crypto sentiment than on integration news. Worth knowing that going in. For news and updates on Stellar partnerships and regulatory wins, CoinDesk’s Stellar coverage and Reuters’ crypto desk are the sources I check.
XLM vs XRP: the family resemblance
This question comes up every time someone learns the founder history. Stellar and Ripple share DNA, and they share use cases. They are not the same project.
Founder split. McCaleb left Ripple in 2014. Stellar isn’t a Ripple fork in the code sense — the codebase diverged significantly — but the design problem is similar: fast, cheap, cross-border payments at internet scale.
Governance. XRP is more closely associated with Ripple Labs, a for-profit company. XLM is governed by the Stellar Development Foundation, a non-profit. The practical effect: Stellar’s narrative leans into financial inclusion and partnerships with NGOs and banks. Ripple’s leans into banking infrastructure and ODL (On-Demand Liquidity).
Consensus. Both use federated consensus models with named validators. Different in detail, similar in spirit.
Market cap. XRP is a top-ten asset most days. XLM sits well outside the top ten — usually somewhere in the 20–40 range. Both are well outside Ethereum’s market position.
If you want the XRP companion piece, the how to buy XRP walkthrough is its sibling.
Why BitGet for buying XLM
A handful of exchanges list XLM. Here’s why I’d point a beginner at BitGet for this token.
Active XLM/USDT order book. XLM has reasonable liquidity on BitGet — a $500 market order won’t move the price. For an asset that sits outside the top ten, that matters.
Honest fee table. Spot maker/taker fees start at 0.10% and drop with BGB holdings or volume. The chart price is the price you trade against. Full breakdown in BitGet trading fees.
Multiple funding paths. Card, bank transfer, P2P, or crypto deposit. You pick the trade-off between speed and cost.
Reliable withdrawals. I’ve withdrawn XLM from BitGet several times. Settles in seconds on the Stellar network and costs almost nothing. Full platform breakdown in the BitGet review.
Country limits. BitGet is not available in the US. UK and EU residents are fine. If you’re in the US, look at Coinbase or Kraken — both list XLM. Everywhere else, this is the workflow I’d run.
Pre-signup checklist
Five things to have to hand before you open the sign-up page.
A photo ID. Passport or driving licence, in date, photo clear. KYC asks for the document plus a selfie.
A live email address. You’ll get 2FA codes, withdrawal confirmations, and security alerts here. Don’t use a burner.
A long password. 16 characters minimum, unique to this account. A password manager makes this painless.
An authenticator app. Google Authenticator, Authy, or 1Password’s TOTP feature all work. Install it before you create the account. SMS 2FA has been the entry point for a lot of account drains — covered in 2FA for crypto.
A funding source. Debit card for instant, bank account for P2P, or an existing wallet for crypto deposit.
Storage plan. Decide where the XLM is going to live before you buy. Trading float on the exchange, long-term holdings on a Ledger Nano X. The hot vs cold wallet breakdown covers the trade-offs.
Step-by-step: BitGet signup
Five steps. About ten minutes if your documents are ready.
- Open the sign-up page. BitGet (affiliate — gives you a small fee rebate on top of the standard tier). Enter email and a strong password.
- Verify the email. A six-digit code arrives in under a minute. Paste it in.
- Turn on 2FA. Security Settings → Authenticator. Scan the QR code with your app and save the backup code somewhere offline. Paper, not screenshot.
- Run KYC. Identity Verification → upload your ID and take a selfie. Most verifications clear in 15 minutes to an hour. Some take longer.
- Connect a payment method. Card if you’re going for instant. P2P and bank transfer can be set up when you fund.
Account ready. Funding next.
Funding: card vs P2P vs bank vs crypto deposit
Four ways to get money on BitGet. Each has a different cost-time trade.
| Method | Fee | Speed | Best for |
|---|---|---|---|
| Crypto deposit | Network fee only | 1–60 min | You already hold USDT/USDC/XLM elsewhere |
| P2P (bank transfer) | 0% (small rate spread) | 5–30 min | Best rate, slightly more steps |
| Bank transfer (third-party) | 0.5–1.5% | 1–3 hours | Mid-size buys |
| Card on-ramp | 1–3% | Instant | First small buy, can’t wait |
Crypto deposit is the cheapest route if you already hold USDT, USDC, or XLM on another exchange or wallet. Send to your BitGet deposit address. USDT on TRC-20 costs about 1 USDT in network fees. ERC-20 is closer to 8 USDT. Pick the network that matches your sending wallet — wrong-network deposits are the most common way beginners lose funds.
P2P matches you against another user selling USDT for your local currency. You send them a bank transfer, BitGet escrows the USDT until the transfer confirms. Rates usually land within 0.5% of mid-market.
Bank transfer through third-party on-ramps is the middle ground — visible fee, clears in a few hours.
Card on-ramp is the fastest and most expensive. Fee is baked into the quoted rate, so USDT will arrive at 1.5–3% above spot. Fine for a first small buy. Bad value as a default.
For XLM specifically, I’d use card for the first $50, P2P or crypto deposit for everything after.
Placing your first XLM trade
Funds on the account. Two ways to convert them to XLM.
Option A: Market order (fast, slightly worse fill)
A market order buys at the best price available right now. Fine for small amounts.
- Open BitGet. Go to Spot Trading.
- Search for XLM/USDT and select the pair.
- On the buy side, pick Market.
- Enter the USDT amount or use the percentage slider.
- Tap Buy XLM. Order fills in a second or two. XLM lands in your spot wallet.
You pay 0.10% in fees plus a small slippage cost.
Option B: Limit order (slower, better price)
A limit order parks a buy at the price you choose.
- Open Spot Trading, select XLM/USDT.
- On the buy side, pick Limit.
- Check current price. Set your limit slightly below the current ask.
- Enter the USDT amount.
- Tap Buy XLM. The order sits in the book until price hits your level.
For anything over $100, limit orders are worth the extra two minutes. XLM spreads can widen during quieter sessions. The BitGet spot trading guide covers order types in full.
How much XLM to buy (position sizing)
XLM trades like a mid-cap, not a blue-chip. Three rules I’d hand a beginner.
Rule one: XLM is correlated to broad market sentiment more than to its own news. When Bitcoin moves 5%, XLM usually moves 6–10% in the same direction. Partnership announcements rarely move the price for long. Don’t size positions on the assumption a single news beat will pump the chart.
Rule two: split entries over weeks. Pick a target — say £500 of XLM over two months — and split into eight or ten weekly buys. You won’t hit the bottom. You won’t hit the top. You will get a reasonable average and stop checking the chart every hour.
Rule three: keep a stablecoin reserve. XLM has had 80%+ drawdowns multiple times. If you go in 100% on day one and price drops 50%, you’ve used your ammo. Keep 30–40% in USDT for the deeper dips.
For a first XLM buy, start with a pub-round amount. Place the trade, watch for two weeks, see how a 15% drop feels. If you sleep fine, scale up.
This is the section where I’d flag that position sizing and reading charts is a skill you don’t pick up from blog posts. If you want to put the time in, Trade Travel Chill (affiliate) is the trading community I’m part of and the structured education I actually trust. Optional, useful when you’re ready. The TTC review covers what’s inside.
Storing XLM: Ledger, Lobstr, or exchange?
You’ve bought the XLM. Where does it live?
Exchange (BitGet)
Fine for active trading float — what you’d be willing to lose without losing sleep. BitGet publishes Proof of Reserves and supports withdrawal at any time. But you don’t hold the private keys. The hot vs cold wallet breakdown covers what that gap actually means in practice.
Hot wallet (Lobstr)
Lobstr is the everyday Stellar wallet most XLM users run. Mobile and web. Clean interface, supports asset issuance, integrates with the Stellar DEX directly. You generate a seed phrase, write it down, and use the wallet to send, receive, and trade XLM and Stellar-based assets.
A hot wallet is connected to the internet. That’s the convenience and the weakness. Good for small balances you’d actually spend or trade. Bad for long-term holding. Note: when you create a Stellar wallet of any kind, the wallet needs a minimum 1 XLM balance to “activate” the account on the network. That’s the network base reserve at work — a small anti-spam measure.
Cold wallet (Ledger Nano X)
A Ledger Nano X is a hardware wallet — a USB-sized device that holds your private keys offline. XLM is supported through Ledger Live. Every send is signed physically on the device, so even a compromised laptop can’t move funds without you confirming on the hardware.
Ledger Nano X costs around £150. Cheaper than the lesson of an exchange failure or a phishing hit. Order from the Ledger store (affiliate). Set it up, write the 24-word seed on the included card, store it somewhere fireproof and away from your home computer. The seed phrase storage guide covers backup options that work.
The split I run for XLM
- Trading float on BitGet: 20% — what’s available for active trades.
- Lobstr: 10% — for testing payments and using the Stellar DEX.
- Ledger long-term: 70% — doesn’t move except to top up.
Full self-custody playbook in how to store crypto safely.
Ready to buy your first XLM?
Sign-up takes 90 seconds, KYC usually clears the same day, and BitGet has reliable XLM/USDT liquidity outside the big four exchanges.
Affiliate link. I may earn a commission at no extra cost to you.
The Stellar memo field: don’t ignore it
Stellar has a quirk that catches beginners out. When you send XLM to an exchange, the exchange usually requires a memo — a short numeric or text tag that tells the exchange which user the deposit belongs to.
Stellar exchanges share deposit addresses across all their users. The memo is how they tell deposits apart. Send XLM to an exchange address without the correct memo and the funds are technically credited to the exchange’s pool but not to your account. Recovery is possible — the exchange usually has a support process — but it’s slow and not always successful.
The fix is simple: when BitGet (or any exchange) shows you a deposit address for XLM, it will also show a deposit memo. Copy both. Paste the memo into the memo field on your sending wallet. Then send.
When you withdraw XLM from BitGet to your own Ledger or Lobstr wallet, no memo is required — personal wallets don’t share addresses. Memos only matter for exchange deposits.
This is the kind of detail that turns a 30-second transfer into a three-day support ticket. Worth knowing before your first XLM move.
Common XLM beginner mistakes
The errors I see most often.
Forgetting the memo on an exchange deposit. Covered above. Most common XLM loss event. Double-check every exchange deposit.
Trying to send to an “empty” wallet without the base reserve. Every Stellar account needs at least 1 XLM to exist on the network. If you create a fresh Lobstr wallet and someone sends you 0.5 XLM, the transaction fails — the receiving account hasn’t been activated yet. The fix: send 1.5 XLM or more on the first deposit to a new wallet.
Sending XLM over the wrong network. When you withdraw from BitGet, pick the Stellar (XLM) network. Some bridges issue wrapped XLM on other chains — don’t use those unless you specifically need the bridged version.
Storing on the exchange forever. Active float yes, life savings no. Move long-term holdings to a hardware wallet.
Mistaking XLM for XRP at the wallet level. They are completely different chains with different addresses and different networks. XLM addresses start with “G”. XRP addresses start with “r”. Confusing the two and sending to the wrong network is irreversible.
Falling for “free XLM” airdrop scams. The Stellar Development Foundation ran legitimate airdrops in the past via Keybase. Those programmes ended years ago. Anyone asking for your seed phrase to “claim airdropped XLM” is trying to drain you. The crypto scams guide covers the playbook.
Sharing the seed phrase. No support agent at any platform will ever ask for it. The phrase lives on paper, at home, and nowhere else.
Skipping 2FA. Set it up the moment you create the BitGet account. Most account drains come from phished credentials hitting accounts without 2FA.
Jumping straight to futures. XLM perpetuals exist. They are for traders who already understand liquidation mechanics. The BitGet futures USDT-M post is research material — not a buy signal. Six months on spot before you touch derivatives.
One last nudge.
If this walkthrough saved you research time, signing up through my affiliate link costs you nothing and helps keep the lights on.
Affiliate link.
Frequently asked questions
What is the minimum amount of Stellar I can buy on BitGet?
You can buy fractional XLM from around $1 worth. XLM is divisible to seven decimal places. Most beginners start with $50–$200 to learn the interface before scaling up.
Do I need to verify my identity to buy XLM on BitGet?
Yes for full functionality. You can hold and trade limited amounts without KYC, but withdrawal limits are tiny. KYC usually clears in 1–24 hours and unlocks full deposit and withdrawal limits. The KYC explained post covers the process.
Can I buy Stellar on BitGet with a credit card?
Yes, but it’s a poor default. Card on-ramps charge 1–3% and many issuers also add a cash-advance fee or block crypto purchases entirely. Use debit, bank transfer, or P2P unless you’re testing the workflow with a small amount.
What is the cheapest way to buy XLM on BitGet?
P2P trading or depositing USDT from another wallet. P2P fees are essentially zero — you pay a small rate spread. Crypto deposit only costs the network fee on whatever chain you’re sending from.
Is Stellar a good long-term hold?
Nobody knows. Stellar has working tech, real-world payment integrations, and a non-profit foundation behind it. The price has tracked broader market cycles more than partnership news. Treat it as one position in a diversified portfolio.
Should I keep my XLM on BitGet or in a wallet?
Move long-term holdings to a Ledger Nano X. Lobstr works as a daily-use hot wallet. Keep an active trading float on the exchange.
What’s the difference between Stellar and Ripple?
Both projects target cross-border payments. Stellar is run by a non-profit (Stellar Development Foundation), XRP is closely associated with Ripple Labs (a for-profit company). Both use federated consensus models. They are separate chains and separate assets.
Why does my Stellar account need a 1 XLM minimum balance?
The Stellar network requires a 1 XLM base reserve per account to prevent spam — keeping inactive accounts off the network. The 1 XLM is not a fee; it stays in your wallet but can’t be sent. Each trustline (added asset) adds another 0.5 XLM reserve.
Final word
The first XLM buy teaches you the workflow for every XLM trade after. Open the account. KYC. Fund the cheapest way you have time for. Place a limit order. Move long-term holdings to a Ledger. And learn the memo rule before your first exchange deposit.
That’s the short version. Do those five things in order and you’ve already avoided the mistakes that catch most beginners on their first XLM trade.
Right — over to you.
One more thing: Buying a token doesn’t mean it will go up. Most altcoins underperform Bitcoin over long enough timeframes. Only buy what you can afford to lose, and never put your rent money in crypto. If a YouTuber tells you a coin will 100x — they’re guessing too.
Related posts
- How to Buy XRP on BitGet: Step-by-Step
- How to Buy Cardano (ADA) on BitGet: Step-by-Step
- How to Store Crypto Safely: The Self-Custody Guide