The most expensive crypto mistake I ever watched a beginner make wasn’t a bad trade. It was a withdrawal. He sent $4,200 of USDT on the Ethereum network from BitGet to a wallet that only supported BSC. The funds bounced into the void. No recovery. No support escalation that mattered. Gone.
Withdrawals are the part of crypto with no undo button. The numbers in this post are the ones you want before you click “confirm”.
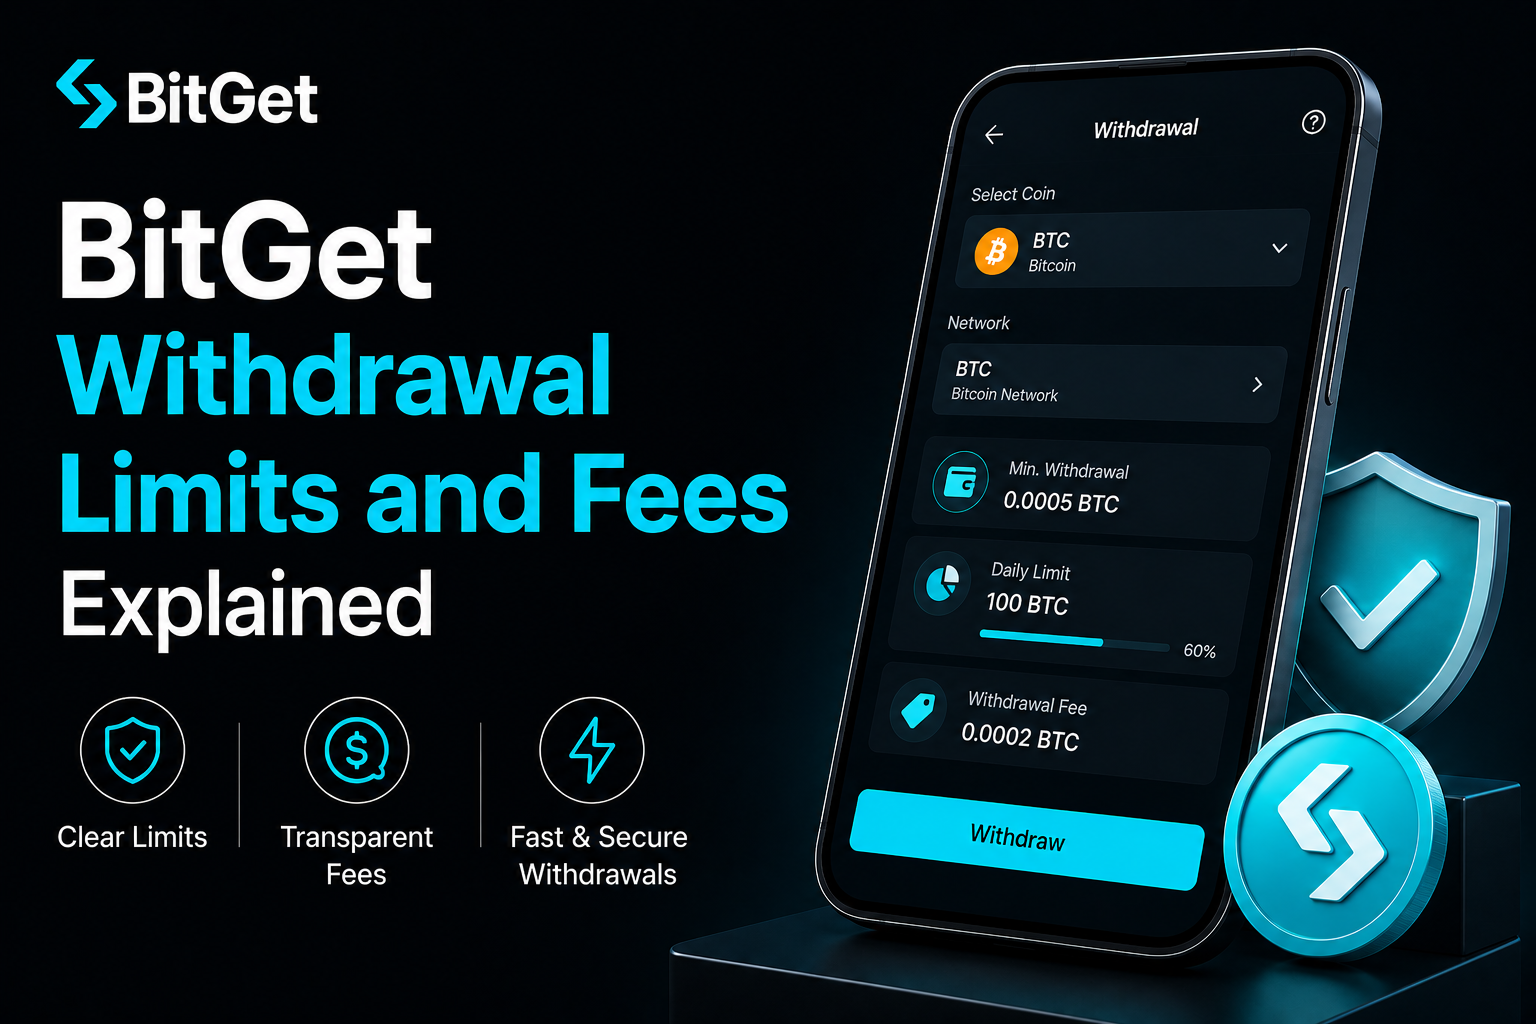
Short answer: BitGet withdrawal fees are charged per network, not per amount. Daily limits scale with your KYC tier — about $200,000/day at Basic, $1M/day at Intermediate, and effectively unlimited at Advanced. Cheapest networks are TRC-20 for USDT (1 USDT flat), Lightning for BTC (when available), and BNB Smart Chain for most ERC-20 tokens. Always send a small test withdrawal first.
Open a BitGet account → (affiliate)
Key takeaways
- Withdrawal limits scale with KYC tier: ~$200,000/day at Basic, ~$1M/day at Intermediate, effectively uncapped at Advanced.
- TRC-20 USDT withdrawals cost a flat 1 USDT — roughly 8x cheaper than ERC-20 USDT during normal Ethereum gas conditions.
- The wrong network is the most expensive mistake in crypto and the most common one. Always check both ends before sending.
- BitGet supports 100+ blockchains for withdrawals across major coins; the right network for each is usually the one with the lowest fees that both ends support.
- Whitelisting addresses prevents an attacker from withdrawing to any address but the ones you’ve pre-approved.
How BitGet withdrawals work
A crypto withdrawal is the platform pushing on-chain funds from its hot wallet to an external address you provide. From your point of view:
- You click “Withdraw” and enter the asset, network, destination address, and amount.
- You approve via 2FA and email (and SMS if you’ve enabled it).
- BitGet runs an internal risk check — large or unusual withdrawals trigger an extra review.
- The on-chain transaction is broadcast from BitGet’s hot wallet.
- The receiving wallet confirms after the required network confirmations.
The fee BitGet charges covers two things: the actual on-chain network fee (paid to miners or validators) and a small platform handling fee. They quote it as one combined number at withdrawal time.
Total time from “click confirm” to “funds confirmed in destination”: usually 5–30 minutes for stablecoins on Tron, BSC, or Solana; 15–60 minutes for Bitcoin on the main network; longer in rare congestion events.
Daily withdrawal limits by KYC tier
The cap depends on your KYC tier. Higher tier, higher limit.
| KYC tier | Daily crypto withdrawal | What this actually means |
|---|---|---|
| Unverified | ~$5,000 worth | Enough to test the platform, not enough to use it seriously |
| Basic | ~$200,000 worth | More than 99% of retail traders will ever need in a day |
| Intermediate | ~$1,000,000 worth | Active high-volume trader territory |
| Advanced | No practical cap | Institutional, OTC, market-maker scale |
The “worth” is calculated at the moment of withdrawal using BitGet’s reference price. If BTC moves 5% between when you check and when you submit, the limit recalculates.
If you need the full KYC breakdown, the BitGet KYC post has the documents and timing for each tier.
For most users the answer is: Basic KYC, $200k/day cap, never an issue.
Fees by network for major coins
This is the table you came for. Real numbers, current as of writing — fees move with network conditions but the relative ordering holds.
Bitcoin (BTC)
| Network | Fee | Time | Notes |
|---|---|---|---|
| Bitcoin (mainnet) | 0.00006–0.0002 BTC | 10–60 min | Standard. Fee floats with mempool. |
| Lightning Network | Often free | Seconds | Small amounts only, both ends must support. |
| BEP-20 (BSC wrapped BTC) | ~$0.30 | 1–3 min | Only useful for trading inside BSC ecosystem. |
Ethereum (ETH)
| Network | Fee | Time | Notes |
|---|---|---|---|
| Ethereum (mainnet) | 0.001–0.005 ETH | 1–10 min | Floats with gas price. Most expensive at peak. |
| Arbitrum | ~$0.50 | 1–3 min | Cheap layer 2. |
| Optimism | ~$0.50 | 1–3 min | Cheap layer 2. |
| BEP-20 (BSC) | ~$0.30 | 1–3 min | For BSC trading only. |
USDT (Tether)
| Network | Fee | Time | Notes |
|---|---|---|---|
| TRC-20 (Tron) | 1 USDT | 1–3 min | The default. Cheap. Universal support. |
| BEP-20 (BSC) | 0.8 USDT | 1–3 min | Slightly cheaper than TRC-20. |
| ERC-20 (Ethereum) | 6–15 USDT | 1–10 min | Use only when destination doesn’t support cheaper option. |
| Polygon | 1 USDT | 1–3 min | Cheap, growing support. |
| Solana | 1 USDT | <1 min | Fast and cheap. |
| Arbitrum | 1 USDT | 1–3 min | Layer 2. |
Solana (SOL)
| Network | Fee | Time | Notes |
|---|---|---|---|
| Solana (mainnet) | 0.001 SOL | <1 min | Fast and almost free. |
BNB
| Network | Fee | Time | Notes |
|---|---|---|---|
| BEP-20 (BSC) | 0.001 BNB | 1–3 min | Standard. |
| BEP-2 (Beacon Chain) | 0.0005 BNB | 1–3 min | Legacy, fewer wallets support. |
USDC
| Network | Fee | Time | Notes |
|---|---|---|---|
| Solana | 0.5 USDC | <1 min | Cheapest. |
| Polygon | 1 USDC | 1–3 min | Cheap. |
| Arbitrum | 1 USDC | 1–3 min | Cheap. |
| ERC-20 (Ethereum) | 4–12 USDC | 1–10 min | Most expensive route. |
Fees update daily. Always check the live fee shown at the withdrawal screen before confirming.
The cheapest network for each coin
Quick reference if you just want the answer.
| Coin | Cheapest network | Approx fee | Caveat |
|---|---|---|---|
| BTC | Lightning (if both ends support) | Free–low | Small amounts only |
| BTC | Bitcoin mainnet | ~0.0001 BTC | Standard route |
| ETH | Arbitrum or Optimism | ~$0.50 | Layer 2 |
| USDT | TRC-20 (Tron) | 1 USDT flat | Most universal |
| USDC | Solana | 0.5 USDC | Wallets must support SPL |
| SOL | Solana mainnet | 0.001 SOL | Only option |
| BNB | BEP-20 | 0.001 BNB | Standard |
| MATIC | Polygon | ~0.1 MATIC | Native |
| AVAX | Avalanche C-chain | ~0.01 AVAX | Standard |
If you’re moving USDT around regularly, learn TRC-20. It’s the cheapest, fastest, and most-supported stablecoin network in retail crypto.
Why network choice matters (the irreversible mistake)
Most crypto can exist on multiple networks. USDT exists on Tron, Ethereum, BSC, Polygon, Solana, Arbitrum, and 10+ others. They’re all called “USDT” but they’re not the same asset on-chain — they’re separate token contracts that share a peg.
When you withdraw USDT from BitGet, you pick a network. The destination wallet has to be on the same network. If you pick TRC-20 and send to an ETH address, the transaction lands but the receiving wallet doesn’t see it — the address might be valid on Tron but belong to someone else (or no one).
Two common disasters:
Disaster 1: Same address, wrong network. ETH and BSC use the same address format (0x…). You copy an address from MetaMask configured for ETH and select BSC at the withdrawal screen. The funds land at the same address on BSC — but your MetaMask doesn’t show them unless you add the BSC network. Recoverable with effort.
Disaster 2: Different address format, wrong network. Tron addresses start with T. Ethereum addresses start with 0x. If you paste a 0x address and select TRC-20, BitGet usually catches this. But some exchange addresses validate across networks and accept it — funds gone.
Disaster 3: Receiving exchange doesn’t support the network. You send TRC-20 USDT to a Kraken deposit address that only supports ERC-20. Funds gone, sometimes recoverable through Kraken support after a 4-week investigation.
The rule: always check the network shown on the destination wallet’s deposit screen and match it exactly on BitGet’s withdrawal screen. Address alone is not enough.
For more on staying safe with exchange transactions, the is BitGet safe and crypto scams guide posts cover the wider stack.
Step-by-step: your first withdrawal
This is the flow. Run it slowly the first time.
- Log into BitGet and go to Assets → Withdraw.
- Select the asset. Pick the coin you want to send (BTC, USDT, ETH, etc).
- Select the network. Critical step. Match this to the network the destination supports. If it’s a Ledger, check what’s set up in Ledger Live. If it’s another exchange, check the deposit screen on that exchange.
- Paste the destination address. Copy from the destination wallet — don’t type. Typos in crypto addresses are usually unrecoverable.
- Double-check the address. First 4 characters and last 4 characters should match what’s shown in the destination wallet. Some address-replacement malware swaps the middle.
- Enter the amount. The interface shows you the fee deducted and the net amount that will arrive.
- For your first send: enter a small test amount. $20 of USDT, $50 of BTC. Whatever’s small but not so trivial that the network fee is most of it.
- Approve via 2FA + email. You’ll get a code by email, paste it back. If you have SMS enabled, that too.
- Wait. Most networks confirm within 5–30 minutes. The withdrawal status moves from “Pending” to “Processing” to “Completed”.
- Verify in the receiving wallet. Funds visible on the other end means the route works. Then send the rest.
This whole flow takes 10 minutes including the wait. The peace of mind is worth it.
The test-withdrawal habit (rehearse the exit)
This is the single best habit I picked up after the 2022 cycle of exchange failures.
Once a quarter, on every exchange I hold meaningful funds on, I:
- Send a small test amount to my cold storage wallet.
- Confirm it lands. Confirm the address still matches what I expect.
- Note how long it took. If slower than last time, flag it.
- Note any new compliance friction (extra ID checks, longer hold times, support tickets required).
This serves three purposes. One: catches any address mismatch or network change before it matters. Two: keeps my muscle memory current so I can move fast in a panic. Three: spots the early signs of exchange trouble — slowing withdrawals are the canary.
The traders who got hit hardest by FTX were the ones who’d never withdrawn. Doors shut, queues clogged, they didn’t know how because they’d never practised.
10 minutes a quarter. The cheapest insurance in crypto.
Whitelisting addresses for safety
The most powerful BitGet security feature most users never enable.
Address whitelisting means BitGet will only allow withdrawals to addresses you’ve pre-approved. An attacker who steals your password and 2FA can still only send funds to the addresses you’ve already authorised — which (if you’ve done it right) are your own cold storage.
How to set it up:
- Account Settings → Security → Withdrawal Whitelist. Enable it.
- Add your trusted addresses. Your Ledger, your other exchange accounts, your hardware wallets. Label them clearly — “Ledger BTC”, “Ledger ETH”, etc.
- Each new address requires a 24-hour cooling-off period before first use. This is intentional. It’s the friction that stops an attacker.
- Lock the setting behind 2FA + email confirmation. Means an attacker can’t just disable whitelisting.
Once enabled, even a fully compromised account can’t drain funds to an attacker’s wallet. They can only send to addresses you authorised days or weeks ago.
The 2FA for crypto post covers the wider account-security stack. Whitelisting + hardware 2FA + a unique password is the trio that makes account takeover almost impossible.
Withdrawals to Ledger
This is the move most serious users make for long-term holdings. The flow:
- Open Ledger Live, pick the asset (BTC, ETH, USDT-ERC20, etc), go to Receive, copy the address.
- On BitGet, withdraw to that address using the matching network (Bitcoin mainnet for BTC, Ethereum for ETH, etc).
- Confirm the first 4 and last 4 characters of the address match on both sides. Twice.
- Send a test amount first — always.
- Once confirmed, send the rest.
The Ledger Nano X handles all the major chains plus thousands of tokens. It’s what I keep my long-term bag on. The full setup is in the Ledger Nano X review, and the wider self-custody framework is in how to store crypto safely.
If you don’t have a Ledger yet, the playbook is straightforward — order one from the official Ledger store (affiliate), set it up, never type the seed phrase into anything connected to the internet.
The split I run on my own portfolio:
- 15% on BitGet for active trading.
- 25% in BitGet Earn (flexible USDT savings) for mid-term.
- 60% on Ledger cold storage.
Adjust based on how much you can afford to lose in an exchange black swan.
Common withdrawal mistakes
This is the catalogue of things to not do.
Wrong network
The number-one cause of unrecoverable losses. Always check both ends. If unsure, send a test.
Missing memo or tag
Some chains (XRP, XLM, ATOM, EOS) require a destination memo or tag in addition to the address. If you send to an exchange address without the memo, funds land in the exchange’s hot wallet but aren’t credited to your account. Recovery is possible but takes weeks of support tickets. Always include the memo if the destination shows one.
Pasting the wrong address
Clipboard hijacking malware exists. It watches for crypto addresses on your clipboard and silently replaces them with the attacker’s. The address looks similar but is different. Always verify first/last 4 characters on both sides.
Sending to a contract address by mistake
Some tokens have contract addresses that look like wallet addresses. Sending tokens to the token’s own contract address usually means they’re stuck there forever.
Forgetting to enable whitelisting
If your account gets compromised and whitelisting is off, an attacker can drain to any address. Whitelisting is the brake.
Withdrawing without testing first
For any amount you’d be upset to lose, send a test transaction. $20 is enough.
Ignoring the network fee on small amounts
Sending $30 of ETH on Ethereum mainnet costs $5+ in fees during peak gas. The transaction makes no economic sense. Use a layer 2 (Arbitrum, Optimism) or batch your withdrawals.
Pending withdrawals — when to worry
BitGet withdrawals usually clear in minutes. Sometimes they stick in “Pending” or “Processing” longer than expected. Here’s the framework.
Under 30 minutes pending
Normal. The internal risk check ran a bit slow, or the network is congested. Wait.
30 min – 4 hours pending
Probably a manual review for a larger withdrawal or one to a new address. Common. Wait.
4–24 hours pending
Worth opening a support ticket. Include the transaction ID, the destination address, and the timestamp. Median resolution is under 12 hours.
Over 24 hours pending
Something is wrong. Support ticket, follow up daily until resolved. Don’t initiate a second withdrawal — that creates ambiguity. One ticket, one withdrawal in flight, clean trail.
What never to do
Don’t share your account password or 2FA with anyone claiming to be support. BitGet support never asks for these. The whole crypto scams guide post explains the pattern.
A note on test withdrawals during volatile periods
During a Bitcoin breakout or crash, withdrawal queues clog up on every major exchange. This isn’t unique to BitGet — Binance, Coinbase, and Kraken all see the same pattern.
If you might need to move funds during volatility, do the test withdrawal in calm conditions. The route is the same. Only the queue speed changes. Knowing the route works lets you move fast when the moment matters.
Sort out your cold storage first.
A Ledger Nano X is the wallet I move my long-term bag to from BitGet. Order, set up, then test the withdrawal route.
Affiliate link.
Fiat withdrawals
Crypto withdrawals are most of the story. BitGet also supports fiat withdrawal through P2P (selling crypto to another user for fiat) and direct bank transfer in supported regions.
The mechanics:
- P2P sell: sell USDT or BTC to a Verified Merchant, receive fiat in your bank. 0% fee from the platform, spread cost only.
- Bank withdrawal (SEPA, Faster Payments): withdraw fiat from your BitGet fiat balance to your bank. Usually €1–€3 fixed fee.
- Card withdrawal: rare, supported in fewer regions. Higher fee.
For most users, P2P sell is the cleanest fiat exit. The BitGet P2P post has the seller flow including how to avoid chargeback fraud.
Start the right way.
Open the account, complete KYC, and run your first test withdrawal. The traders who do this once at the start never get caught out later.
Affiliate link.
Frequently asked questions
What is the BitGet withdrawal fee?
The fee depends on the asset and network. USDT on TRC-20 is a flat 1 USDT. BTC on Bitcoin mainnet floats with the mempool, usually 0.0001 BTC. Always check the live fee shown at the withdrawal screen.
What is the BitGet daily withdrawal limit?
Limits scale with KYC tier. Basic KYC: ~$200,000/day. Intermediate: ~$1,000,000/day. Advanced: effectively no cap. Unverified accounts are capped at about $5,000/day.
Which network is cheapest for USDT withdrawals on BitGet?
TRC-20 (Tron) is the standard at 1 USDT flat. BEP-20 (BSC) is slightly cheaper at 0.8 USDT. Both are massively cheaper than ERC-20 (Ethereum), which can hit 8–15 USDT during high gas.
How long does a BitGet withdrawal take?
Usually 5–30 minutes total. Stablecoin withdrawals on Tron, BSC, or Solana clear fastest. BTC on Bitcoin mainnet takes 15–60 minutes depending on network congestion.
What happens if I withdraw to the wrong network?
In most cases the funds are unrecoverable. The receiving wallet doesn’t see them, and BitGet can’t reverse the on-chain transaction. Always match the network on both ends and send a test amount first.
Can I cancel a BitGet withdrawal?
If the withdrawal is still in “Pending” or “Processing” status, you can sometimes cancel from the Assets menu. Once it’s broadcast to the network, it cannot be cancelled or reversed.
What is BitGet’s address whitelist?
A security feature that restricts withdrawals to pre-approved addresses only. Enable it in Account Settings → Security → Withdrawal Whitelist. Each new address has a 24-hour cooling-off period before first use.
Why is my BitGet withdrawal pending so long?
Under 30 minutes is normal. 30 minutes to 4 hours often means a manual review for larger amounts or new addresses. Over 4 hours, open a support ticket with the transaction ID.
Final word
Withdrawals are where carelessness costs money. The fix is process. Network match, address verify, test transaction, then send. Five extra minutes, no catastrophes.
If I were starting today: complete KYC, set up whitelisting before I deposited anything, send a test withdrawal to my cold storage address, then use BitGet for active trading with the long-term bag safely off-platform.
Right — over to you.
Related posts
- BitGet Review: The Crypto Exchange I Actually Use
- How to Store Crypto Safely
- BitGet KYC: What’s Required and How Long It Takes