Heads up: This post covers leveraged trading. Leverage can wipe out your account in a single move. If you’re new to crypto, start with spot trading and learn the basics before touching futures or bots. The numbers in this article are not promises — they’re examples.
The first time I ran a futures grid I set leverage at 10x because the BitGet slider went that high and I thought I knew better. Inside 36 hours BTC dropped 4%, my margin ratio hit 80%, and I was awake at 3am moving USDT into the account to avoid liquidation. The bot’s realised profit was a respectable 0.6%. The unrealised position was -32%. That night taught me what every futures grid post on the internet skips: leverage isn’t a return multiplier, it’s a liquidation timer.
This is the post that explains when a futures grid actually makes sense, what leverage to use, and how to size the buffer so the bot doesn’t blow up while you’re sleeping.
Short answer: A BitGet futures grid bot runs the same range-trading logic as a spot grid but on perpetual contracts with leverage. Realistic use case is 2-3x leverage on majors, on a range that gives you at least 25-30% buffer to liquidation, with the funding rate skew accounted for. The combo of futures grid plus funding-rate farming is the actual edge. Going higher than 3x is a fast track to forced liquidation.
See the spot bot I run instead → (affiliate)
Key takeaways
- Futures grid bots multiply both gains and losses by your leverage setting — and add a liquidation risk that spot grids don’t have.
- Realistic leverage for a futures grid is 2-3x on majors. Anything above 5x is gambling with extra steps.
- Funding rate is the silent variable. Positive funding pays longs to be short, and vice versa — it can flip a profitable grid into a losing one.
- The unique edge of a futures grid is combining grid profits with funding-rate harvesting in the right market structure.
- Strong directional trends destroy futures grids — pause the bot when a clear trend develops.
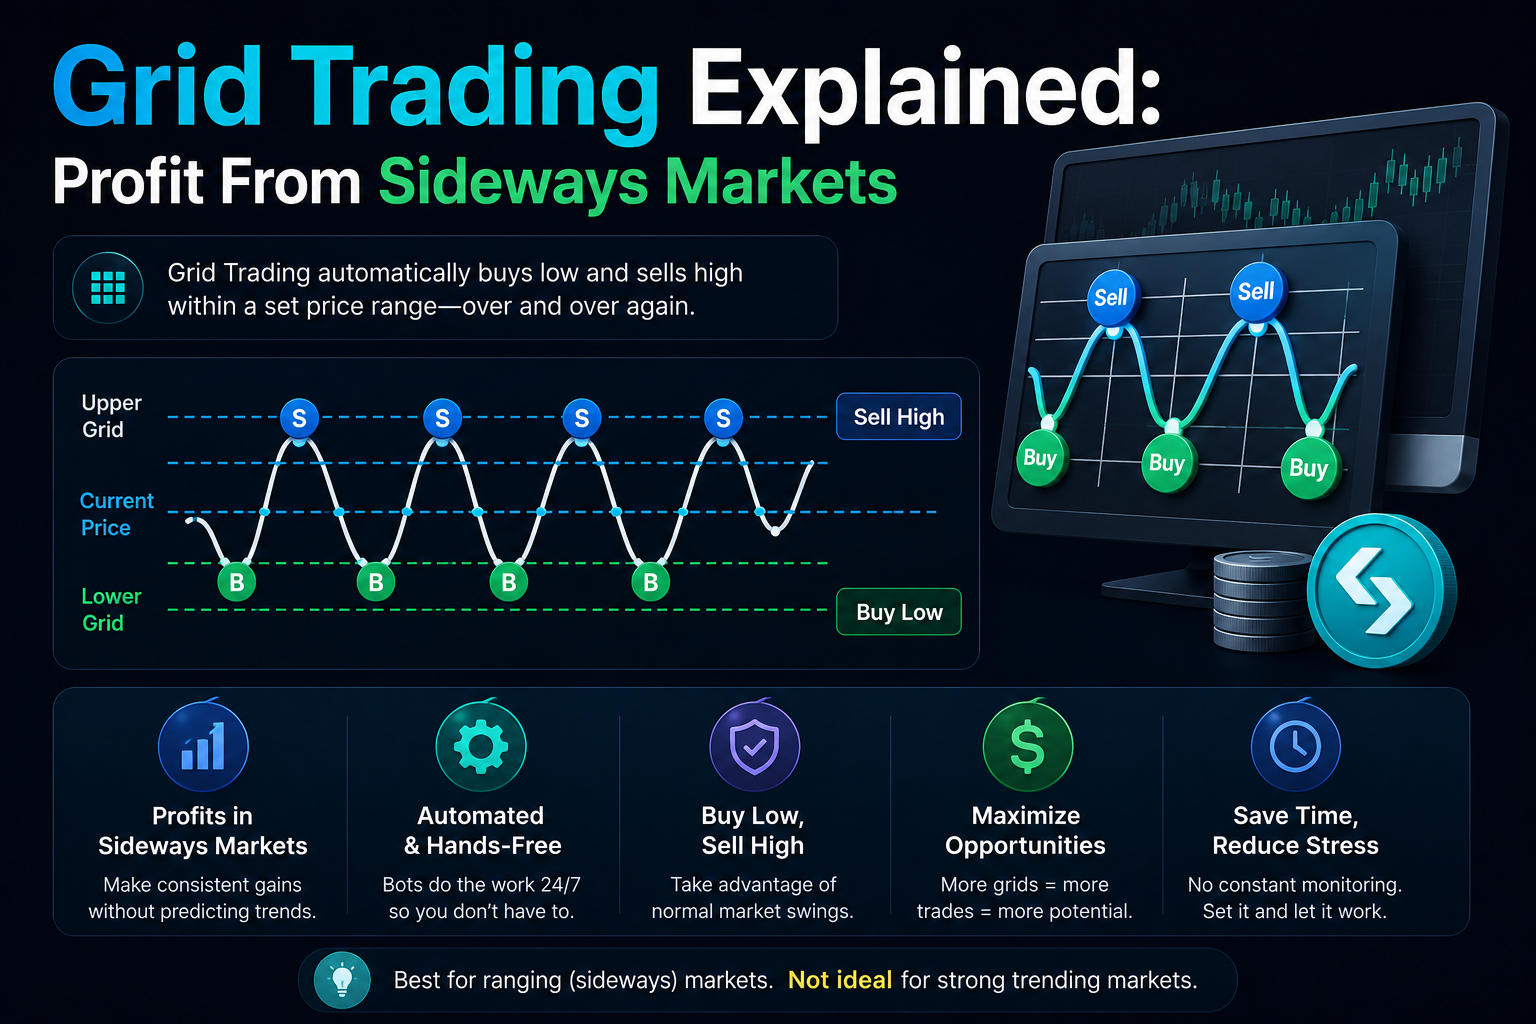
What a futures grid bot does
Same logic as a spot grid, different instrument.
The mechanical similarity
A grid bot places buy orders at price rungs below the current price and sell orders above. When price falls and hits a buy rung, the bot buys. When price rises and hits a sell rung, the bot sells. Every completed buy-sell pair is a small realised profit.
On a spot grid, the bot is buying and selling actual crypto. On a futures grid, the bot is opening and closing perpetual futures contracts.
What changes on futures
Three things change:
- Leverage. Futures contracts let you control more position than your margin posted. 2x leverage means $1K of margin controls $2K of position.
- Funding rate. Holders of long perpetual positions pay (or receive) a periodic funding rate based on the perp-spot price gap. Roughly every 8 hours on BitGet.
- Liquidation. If the unrealised loss on the position approaches the margin posted, the position liquidates. You lose the margin and the position closes at whatever price.
These three differences mean a futures grid is a different risk profile to a spot grid even when the strategy code is identical.
Long-only, short-only, or neutral
BitGet’s futures grid lets you pick the direction:
- Long grid: the bot expects price to bounce around the range and accumulates long inventory on dips.
- Short grid: the bot accumulates short inventory on rallies.
- Neutral grid: the bot opens both long and short legs as price moves through the range.
Neutral grids are the most common implementation because they don’t bake in a directional bias. Long grids work in a bull-leaning chop. Short grids work in a bear-leaning chop. Most retail users default to neutral.
Why leverage changes everything
Leverage is the part most futures grid tutorials underplay.
The math of leverage and drawdown
At 1x leverage, a 10% drop in the underlying is a 10% drawdown on your position. Painful but recoverable.
At 5x leverage, a 10% drop in the underlying is a 50% drawdown. Recoverable only if the asset recovers and you didn’t get liquidated in the meantime.
At 10x leverage, a 10% drop is a 100% drawdown. You’re liquidated before you finish reading the news headline that caused it.
The liquidation threshold
Every leveraged position has a liquidation price. The higher your leverage, the closer that liquidation price is to your entry. On BitGet, the liquidation price is calculated based on your initial margin, position size, and the maintenance margin requirement.
According to BitGet’s documentation, at 10x leverage on BTC, the liquidation distance from entry is roughly 9-10%. At 3x, it’s roughly 30%. At 2x, roughly 45-48%.
Your grid range needs to sit comfortably inside the liquidation distance. If your range is 20% wide and your liquidation is at 15% from entry, the bot will liquidate before exiting the range. Game over.
The buffer math
Practical rule: leverage should be set so the liquidation price is at least 1.5x further from current price than the bottom of your grid range.
If your range bottom is 15% below current price, your liquidation should be at least 22.5% below current. That requires leverage of roughly 4x or less on majors.
I run at 2-3x on my futures grids. The realised return per round trip is smaller than at 5x, but the bot doesn’t liquidate on a normal market move. Sleep matters.
The honest leverage decision
If you’re tempted to set leverage higher than 3x on a futures grid, ask yourself why. The bot’s edge comes from compounding small wins. Not from one big leveraged move. High leverage doesn’t multiply your edge — it multiplies your exposure to being wrong.
For BitGet’s leverage breakdown, the leverage page goes deeper into the maths.
Futures grid vs spot grid (the key differences)
The clearest side-by-side.
| Factor | Spot grid | Futures grid |
|---|---|---|
| Capital efficiency | 1x — you post the full position | 2-10x — you post a fraction as margin |
| Liquidation risk | None | Yes, at the liquidation price |
| Funding rate | None | Pays or receives, every 8 hours |
| Best for | Long-term majors, want inventory anyway | Capital-efficient range trading, no inventory desire |
| Drawdown profile | Bounded by spot price | Multiplied by leverage |
| Tax treatment (varies by country) | Disposal events | Often different — check locally |
| Holding period | Indefinite | Indefinite, but funding cost accumulates |
| Tools required | Spot account | Futures account, KYC tier permitting |
When the spot grid is the right choice
You want to accumulate the underlying anyway. You don’t need capital efficiency. You’d rather take less risk for less return. You’re newer to bots.
When the futures grid is the right choice
You don’t want to hold the underlying long-term. You want to deploy less margin while running a bigger nominal position. You understand liquidation maths and can monitor the bot. You want to capture funding rate alongside grid profits.
When neither is the right choice
The market is in a strong directional trend. Both spot and futures grids underperform during sustained moves. The right play in a trend is to hold spot directly (if bullish) or step aside (if bearish).
Prefer the safer spot version?
My BTC/USDT spot grid is the no-leverage version of the same strategy. Same range logic, no liquidation risk.
Affiliate link.
Funding rate impact on futures grid
The variable that flips a profitable bot into a losing one.
What funding rate is
Perpetual futures don’t have an expiry. To keep the perp price aligned with spot, exchanges charge or pay a periodic funding rate. On BitGet, funding settles every 8 hours.
If the perp is trading above spot (long demand), longs pay shorts. If the perp is below spot (short demand), shorts pay longs.
The typical range
Funding rate on BTC perpetuals is usually somewhere between -0.01% and +0.02% per 8-hour window. Across a year that’s typically between -10% and +20% annualised.
In bull markets with heavy long bias, funding can spike to +0.05% per 8 hours and stay there for days. That’s roughly +55% annualised. If you’re long the perp during that period, you’re paying 55%/year just to hold the position.
How this affects your grid
A neutral grid opens both long and short legs as price moves. The long legs pay funding when funding is positive. The short legs receive it. In a balanced market, the funding payments largely cancel.
In a skewed market, they don’t. If funding is consistently positive, the long legs of your grid bleed money. If it’s consistently negative, the short legs bleed money. Either way, your net realised return drops.
Reading the funding rate before deploying
Check the current and historical funding rate on BitGet’s futures USDT-M dashboard before deploying any futures grid. If funding has been heavily one-sided for several days, your bot’s directional bias needs to account for it.
Practical rule: if funding has averaged over +0.03% per 8 hours for the last 7 days, run a short-biased grid or skip it. If funding has averaged below -0.02% for 7 days, run a long-biased grid.
The combo edge
This is the actual edge of a futures grid over spot. In the right conditions you can run a short grid that collects funding payments on top of the grid profits. The funding payment can be the difference between a 5% annualised return and a 15% annualised return on the same strategy.
More on this in the funding farming section below.
Setting leverage on a futures grid (start at 2x-3x)
The actual setup numbers.
My default: 2x on majors
For BTC/USDT or ETH/USDT perpetuals, my default is 2x leverage. Reasons:
- Liquidation distance is roughly 45%+, well outside any reasonable grid range
- Funding cost is manageable
- The bot can survive a 30% adverse move without liquidating
- I sleep at night
When I push to 3x
If the funding rate is heavily favourable (paying me significantly) and the underlying is in clear range structure, I’ll occasionally push to 3x. The extra leverage extracts more from each round trip and amplifies the funding capture.
I still want at least 30% buffer between range bottom and liquidation. At 3x on a major, that’s roughly the available buffer.
Why I never go above 5x
At 5x on BTC, liquidation distance is roughly 18%. Normal BTC volatility can move 12-15% in a week without anything fundamental changing. The bot can hit liquidation on routine price action.
People who run 10x and 20x grids are not running grids. They’re running short-term directional positions with extra steps. The risk profile is completely different.
The starting position
When deploying a futures grid, you typically start with no position. The bot opens its first leg on the first price move. This means the first hours of bot life carry no leverage exposure. Your liquidation risk only develops as the bot accumulates inventory.
I monitor closely for the first 24 hours after deploying. If something is going to break, it breaks early.
Range selection for futures grids
Similar to spot, with one critical adjustment.
The 60-day high/low method
For futures grids I use a tighter range than for spot. Reason: time decay via funding accumulates faster, and I want the bot to complete round trips at higher frequency.
My defaults:
- Range upper: 60-day high + 3%
- Range lower: 60-day low – 3%
- Grid count: 40-60
- Mode: arithmetic
Why tighter than spot
A spot grid can hold inventory through a multi-month range break. A futures grid pays funding the whole time it’s holding. The economics shift in favour of faster round trips and tighter ranges.
The liquidation overlay
Before deploying, calculate liquidation price for your chosen leverage and range. The liquidation must sit comfortably beyond the range bottom (for long-biased grids) or above the range top (for short-biased grids).
If your range bottom is at $58K and liquidation is at $54K, the buffer is too thin. Widen the range upward (so the bot enters at a different position), reduce the leverage, or pick a different pair.
Adjusting for volatility
In high-volatility periods, widen the range. In low-volatility periods, tighten it. The static 60-day approach is a default — adjust based on the actual realised volatility you’re seeing.
Glassnode and on-chain analytics platforms publish realised volatility numbers that can help calibrate.
Liquidation risk + how to add buffer
The mechanics of not blowing up.
What liquidation actually means
When your margin ratio reaches the maintenance margin threshold, BitGet’s risk engine closes your position automatically at the prevailing market price. The remaining margin (after liquidation fees) returns to your account. The position is gone. The bot is paused.
You haven’t lost everything in the account — only the margin posted on the liquidated position. But if the bot had accumulated significant inventory, you’ve lost the inventory’s mark-to-market value plus the liquidation fee.
The three buffers I add
Buffer 1: leverage cap. I never set leverage higher than what allows for 25-30% range-to-liquidation buffer.
Buffer 2: margin top-up. I keep an extra 30-50% of the bot’s initial margin available in the futures wallet but not deployed. If the position moves against me, I can add margin to push the liquidation price further out.
Buffer 3: alert threshold. I set a price alert at the level where my margin ratio would hit 60%. That gives me hours of warning to add margin or close the bot manually.
What I do when an alert triggers
The alert means the bot is at the warning threshold, not the liquidation threshold. I have options:
- Add margin from the futures wallet buffer
- Pause the bot and let the inventory ride at higher buffer
- Close the bot manually and reassess
I never let the position run to maintenance margin. By that point, decisions are forced and outcomes are worse.
The catastrophic move scenario
A 20% gap down on BTC in a single hour (which has happened in past market events) liquidates almost any leveraged position regardless of buffer. The only protection against catastrophic gaps is a) lower leverage, b) smaller position size, or c) hedging the position separately. There is no setting on the bot that prevents a sufficiently fast adverse move from liquidating.
This is the case I price in by sizing the futures grid at no more than 3-5% of trading capital. If it blows up entirely, I lose a piece I can survive losing.
BitGet futures grid step-by-step
Actual setup walk-through.
Step 1: complete KYC tier for futures
Futures trading on BitGet requires a higher KYC tier than spot. The BitGet KYC walkthrough covers the tiers. Tier 2 is usually required for futures access. Plan a day for verification.
Step 2: fund the futures wallet
Transfer USDT from spot to futures via the internal wallet transfer (it’s instant, no fee). Fund the amount you’re deploying plus the 30-50% margin buffer.
Step 3: pick a pair
BTC/USDT and ETH/USDT are the defaults. Both have deep liquidity and tight spreads. SOL/USDT and similar majors can work but use shorter range and smaller allocation.
Step 4: check funding rate history
Open the funding rate chart for the pair. Look at the last 30 days of funding settlements. If funding has been strongly one-sided, decide your directional bias accordingly.
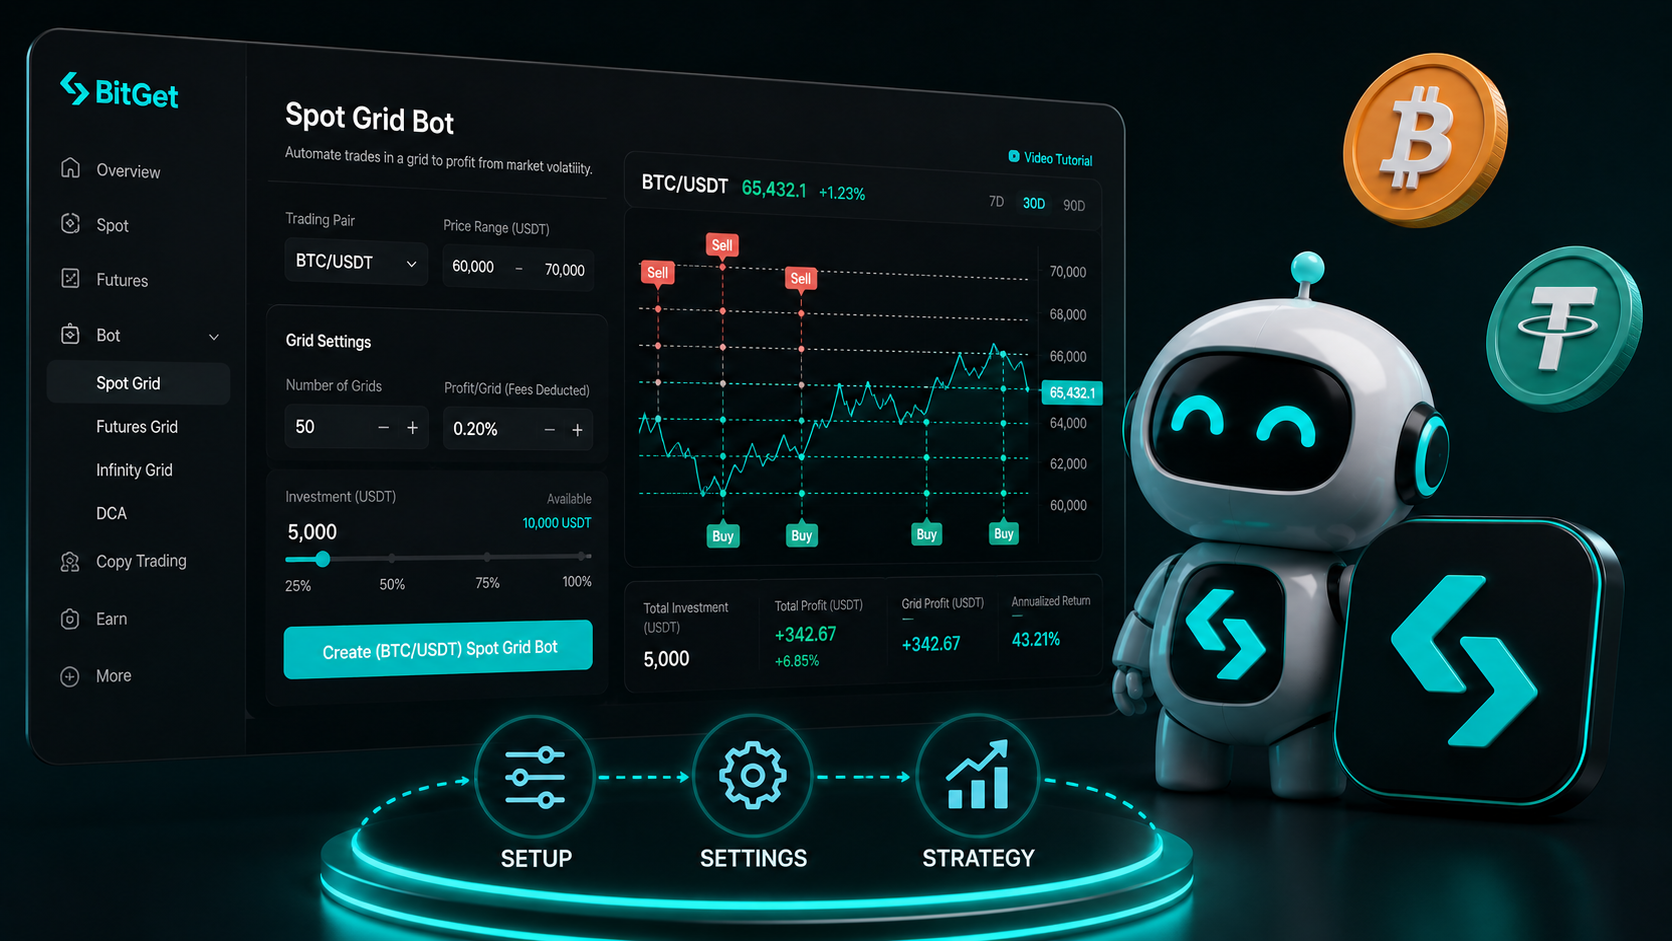
Step 5: navigate to Futures Grid
Trading Bots > Futures Grid > Create. Pick your pair.
Step 6: configure parameters
- Direction: Neutral (default), Long, or Short
- Range upper: 60-day high + 3%
- Range lower: 60-day low – 3%
- Grid count: 50
- Mode: arithmetic
- Leverage: 2x or 3x
- Investment: 3-5% of trading capital
Step 7: review liquidation estimates
BitGet displays the estimated liquidation prices for both long and short legs based on your settings. Confirm these sit comfortably outside your range.
Step 8: deploy
Click create. The bot starts trading. Monitor closely for the first 24 hours.
Step 9: set price alerts
Set alerts at the price that would trigger a 60% margin ratio. Most exchanges and apps let you do this externally if you prefer not to rely on BitGet’s in-app alerts.
Step 10: weekly review
Check the bot once a week minimum. Adjust leverage or range if conditions shift meaningfully.
The combo: futures grid + funding farming
The actual edge.
Why this works
In a market with persistently positive funding, shorts are being paid every 8 hours just for being short. A short-biased grid earns:
- Realised grid profit from round trips
- Funding payments every 8 hours
Combined, the annualised return can be 1.5-2x the same strategy run neutral.
The conditions to look for
- Funding rate has averaged above +0.03% per 8 hours for at least 7 days
- The asset is in clear range structure (not a strong uptrend, despite the bullish funding)
- Open interest is high and rising (lots of leveraged longs to pay funding)
The setup
- Direction: Short
- Range: skewed slightly above current price (you want to accumulate short on rallies)
- Leverage: 2x
- Plan to hold for as long as funding stays positive
The exit signal
When funding flips negative or normalises to under +0.01% for several settlements, the edge dies. Close the bot, reassess, redeploy in a different direction or sit out.
When this fails
If funding is positive because the market really is about to break out upward, your short grid loses money on the directional move faster than the funding pays you. Funding alone isn’t a strategy — it’s a complement to the range thesis.
I only run funding-farm grids when the range thesis is independently solid. Otherwise the funding bonus isn’t enough to overcome a real trend.
For broader strategy context, are crypto bots profitable covers the realistic edge cases.
When NOT to run futures grid (strong directional trends)
The conditions where this strategy loses.
Signal 1: clear uptrend with confirmation
Multiple consecutive weekly closes above prior resistance. Higher highs and higher lows on the weekly chart. The asset is clearly trending.
A neutral or short grid in this environment loses repeatedly. The bot opens shorts that get carried against you. Funding may flip to favour longs, making the bot pay funding on top of the directional loss.
What to do instead: close the grid, take any directional position outright (if you have a view), or sit out.
Signal 2: clear downtrend with confirmation
Multiple consecutive weekly closes below support. Lower highs and lower lows. The asset is in genuine decline.
A neutral or long grid in this environment accumulates inventory all the way down. Even at 2x leverage, a sustained 30% decline gets close to liquidation.
What to do instead: close the grid, wait for the decline to stabilise, redeploy at a new range.
Signal 3: funding rate extremes that persist
Funding rate sitting above +0.05% for more than 5 days, or below -0.04% for the same period. Either is a sign the market is in extreme positioning. Sharp reversals tend to follow.
What to do instead: pause the bot. Wait for funding to normalise. Resume when the market structure stabilises.
Signal 4: macro catalyst pending
FOMC decision, halving, major ETF event, regulatory announcement. These tend to break ranges with violent moves. Futures grids hit liquidation more easily during these events than spot grids do.
What to do instead: pause 24 hours before, resume 24-48 hours after.
Signal 5: thin liquidity
Weekends, major holidays, low-volume periods can produce wider spreads and sharper moves. Pause the bot during periods of unusual market structure if you can’t monitor.
Frequently asked questions
What’s the safest leverage for a futures grid?
2x on majors is my default. 3x is acceptable if funding strongly favours your direction and the range is well-defined. Above 5x is gambling with extra steps regardless of how it’s marketed.
Can a futures grid bot be liquidated?
Yes. If price moves far enough against the accumulated position, the bot’s position liquidates. The bot stops trading and the margin posted is lost.
How is funding rate handled by the bot?
The bot doesn’t manage funding directly — funding is charged or credited to your futures account every 8 hours based on the perp positions the bot has open. You absorb the funding cost or benefit.
What’s the minimum capital for a futures grid?
Practical minimum is around $500 of posted margin. Below that, position sizes are too small to round-trip meaningfully. I’d suggest at least $1K for any serious deployment.
Should I use isolated or cross margin?
Isolated margin on the bot specifically. Cross margin means a bad move on the bot can pull from your other futures positions. Isolate the risk. The BitGet margin trading post covers the difference.
How often does the bot rebalance during funding?
The bot doesn’t rebalance for funding events. It continues running the grid logic. You separately bear the funding cost or income.
Can I run multiple futures grids on the same pair?
Yes, but the positions net against each other. You won’t get any extra exposure — you’ll just split fees and complexity across multiple bots. Generally not worth it.
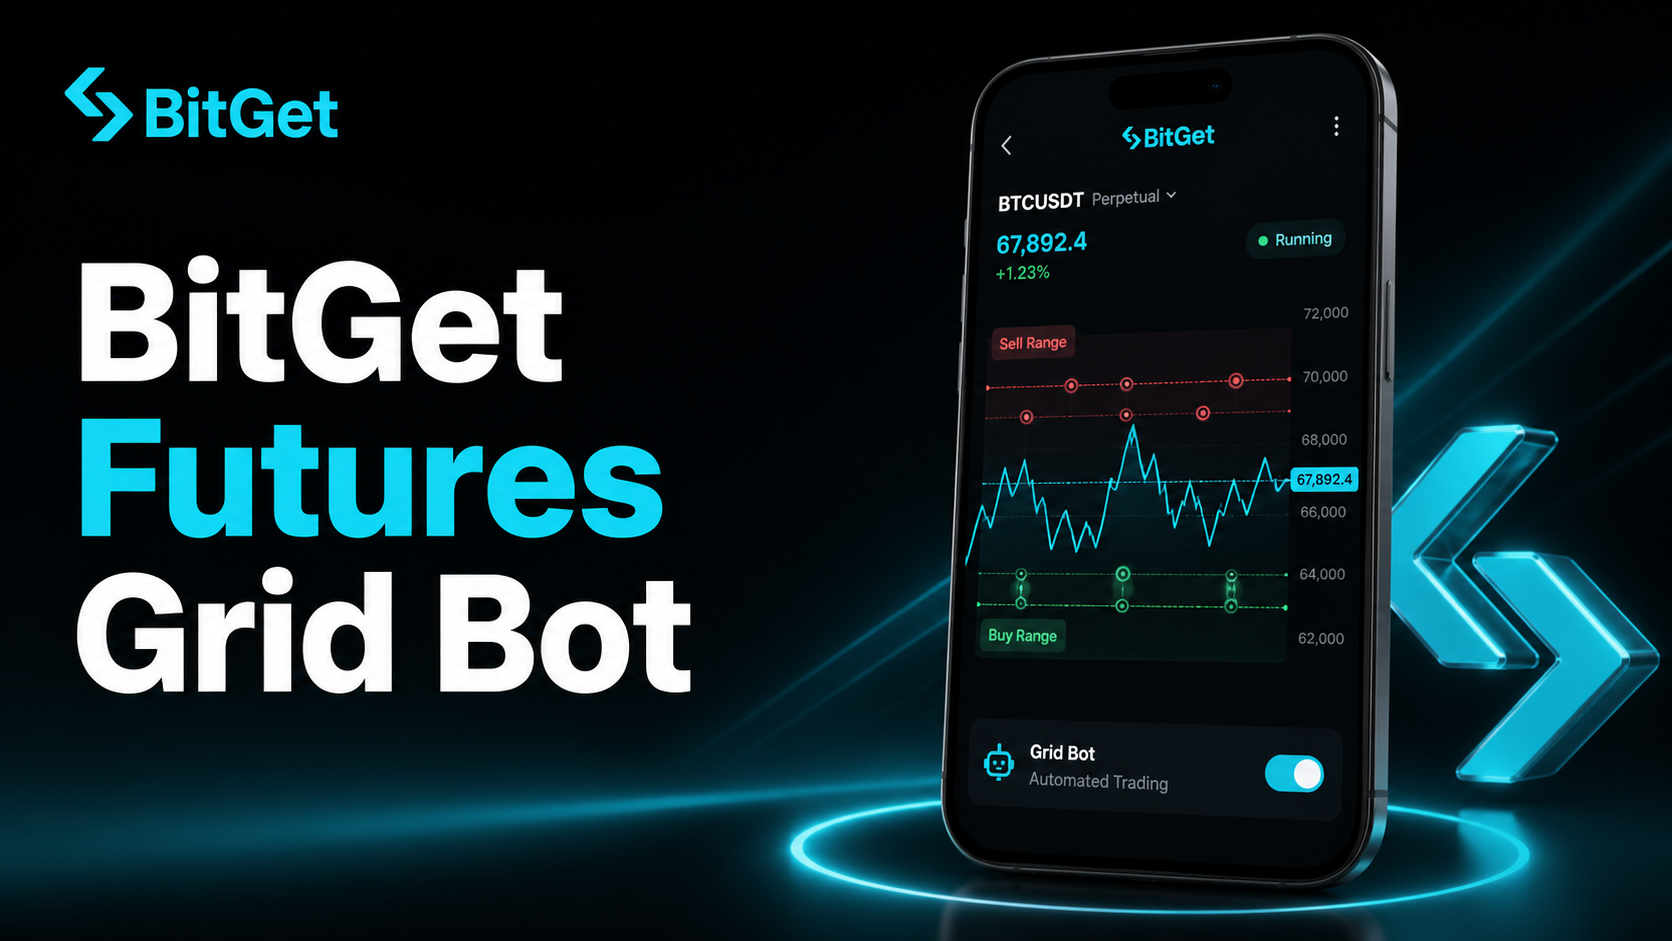
Is the futures grid available on the BitGet mobile app?
Yes. Same interface as the web version. The BitGet app walkthrough covers the bot section in detail.
My honest take
A futures grid is a more capital-efficient version of a spot grid with extra ways to lose money. The funding-rate edge is real but only in specific conditions. The leverage is a tool that mostly people use to amplify their mistakes.
I run a small futures grid alongside my main spot grid. The spot grid is the workhorse — 5-8% of trading capital, no liquidation risk, steady performance. The futures grid is the side bet — 3-5% of capital, run only when funding conditions favour it, paused when conditions change.
If you’re new to bots, do not start with futures. Start with the spot version. Learn how grids behave through a few market conditions. Add futures only when you can answer the leverage and liquidation maths in your sleep.
For broader strategy education — when to deploy, when to step aside — Trade Travel Chill is the community I’m part of and the structured education source I trust. Trade Travel Chill (affiliate) covers exactly this kind of decision discipline.
Right — over to you.
Start with the spot version
If you’re new to grids, the spot version is the safer first step. Same range logic, no liquidation, no funding rate to track.
Affiliate link. I may earn a commission at no extra cost to you.
Related posts
- BitGet Spot Grid Bot — Setup and Strategy
- BitGet Futures USDT-M Perpetuals Explained
- BitGet Leverage Explained